🌿 Garden Whirl Quilt Block Tutorial
- Kanitta

- May 19, 2025
- 2 min read
Updated: Apr 28
Finished size: 10" x 10"
Looking for a block that spins with floral charm? 🌸 Meet the Garden Whirl—a graceful mix of soft florals, angled seams, and simple piecing that brings movement and beauty to your quilt top.

With four large petal shapes surrounding a floral center and leafy green corners, this block is perfect for showing off your favorite prints. It’s also a great chance to practice stitch-and-flip techniques and half-square triangles!
✂️ What You’ll Need (for one 10" block finished):
Petals
(4) 4.5" x 4.5" squares – floral fabric
(8) 1.5" x 1.5" squares – white fabric (for snowballing the petals)
Center
(1) 2.5" x 2.5" square – contrasting print or blender
Leaves
(2) 3" x 3" green squares
(2) 3" x 3" white squares(Make 4 HSTs and pair them to form leaf shapes)
(8) 1.5" x 1.5" squares green squares
Background
(4) 2.5" x 2.5" white squares (block corners)
Loved this free pattern?
💖If it brought you joy, I’d be so grateful for a little support, enough to help me buy new fabrics, testers, or tools to share even more creations!
Your support is totally optional—no pressure at all
You can also support my work by purchasing this pattern—a quilted coin purse project that’s perfect for a quick and thoughtful handmade gift.

🧵 Step-by-Step Instructions:
1. Make the Petal Units
Take a 4.5" floral square and place a 1.5" white square on 2 corners, right sides together.
Draw a diagonal line across the white square.
Sew on the line, trim ¼" from the seam, then flip and press.
Place a 1.5" green square on the lower left corner, right sides together. Use the same stitch-and-flip method you did with the white squares.
Repeat for all four petals.

2. Make the Leaf Units
Pair each green 3" square with a white 3" square.
Draw a diagonal line, stitch ¼" on both sides, and cut on the line to create 2 HSTs per pair.
Trim HSTs to 2.5" square.
Join two HSTs to a 2.5" square white fabric. Make four.

3. Assemble the block
Sew the leaf unit with the petals.

Start with the first petal – Place it right sides together with the center square. Start stitching ¼" away from the edge.

Add the second and third petals – Sew them around the center square in a log cabin-style sequence.
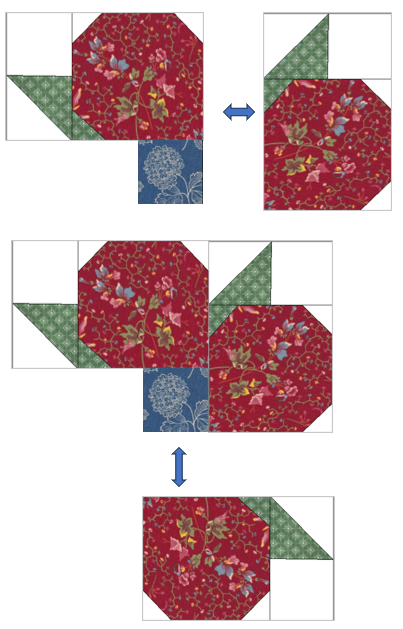
Attach the fourth petal – Gently fold the first petal out of the way, then sew the fourth petal to the center square as usual.

Finish the round – Now bring the first petal back into position and sew the remaining seam to connect it with the fourth petal. Start sewing exactly where you left off earlier.
4. Final Press
Give your block a good press.
🪡 Tips for Success:
Matching the seams where the leaf points meet can be a little tricky—pinning helps!
This block spins beautifully—try it in scrappy colors or soft gradients for a whole-quilt layout.
Perfect for small-scale floral prints or vintage fabric pulls.
🧵 Ready to Whirl into Your Next Project?
Use this block in table toppers, garden-themed quilts, or mini wall hangings. It’s a great block to build confidence with angled piecing while keeping it beginner-friendly.


Comments