


Richmond Quilt Block: A Traditional Favorite,
Pieced Two Ways
Finished Sizes: 12" × 12"
About this block
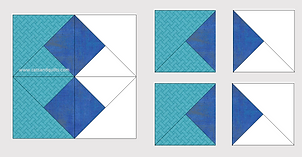
I first spotted this block on Pinterest and loved how intricate it looked, even though it's really made from familiar quilting units. I saved the image and reconstructed it in my own way.
Later, I discovered that the Pinterest version appears to be a variation of a traditional block known as Aunt Vina's Favorite. Quilt historian Barbara Brackman identifies the design as BlockBase #1654, with an early version published around 1915 as Richmond. In the 1930s, it appeared again as Aunt Vina's Favorite.
I love how traditional blocks travel through generations, changing names, colors, and construction methods along the way.
Why I Changed the Construction from the Version I First Saw
Although the Pinterest version inspired my block, I didn't follow a pattern or construction instructions. I worked from the image and figured out how I wanted to piece it. One section in particular caught my attention: the Four-Patch Square-in-a-Square unit.
The original approach was to construct it from four Y-shaped units. It works, but when the two adjoining pieces are the same fabric, that method creates a seam running through what visually looks like one continuous patch.
If you're making a scrappy version or using two different fabrics, that seam isn't really a problem. But with the same fabric on both sides, I didn't see a reason for it to be there.
It also means matching four separate units at the center, adding another point that needs careful alignment without really adding anything to the design.
Two Ways to Make It
I've included two construction options.
Option 1 takes a few more steps, but the cutting is easier and you can oversize and trim the unit for better accuracy. It also gives you a reliable ¼" seam allowance beyond the Four-Patch points.
Option 2 uses fewer steps, but the on-point construction requires some ⅞" measurements and leaves less room for adjustment. You'll need to piece more carefully to keep those points intact.
Which Do I Prefer?
I prefer Option 1. The extra steps are worth it for easier cutting, better accuracy, and the ability to trim the unit to size. But I've included both methods so you can choose whichever works best for you.
That's one of the things I love about traditional quilt blocks: even after more than a century, there's still room to find a different way to make them.

Your support helps me create more free quilt patterns and tutorials.
Pumpkin Patch
My newest quilt pattern! 🎃 This pattern includes two seasonal designs in one—a cozy Fall Pumpkin and a playful Halloween Jack-o’-Lantern—with step-by-step instructions and a video sew-along to guide you through the process. Choose your favorite, or make both!
Cutting Guide
Option 1
Dark blue
(2) 5” x 5”
(4) 2 ½” x 2 ½”
Medium blue
(2) 5 ¼” x 5 ¼” cut diagonally twice to make 4 triangles
(Oversize – 5⅜" x 5⅜")
Light blue
(1) 5 ¼” x 5 ¼” cut diagonally twice to make 4 triangles
(8) 2 ½” x 2 ½”
Background
(1) 4 ½” x 4 ½”
(8) 2 ½” x 2 ½”
(2) 5” x 5”
(1) 5 ¼” x 5 ¼” cut diagonally twice to make 4 triangles
(Oversize – 5⅜" x 5⅜")

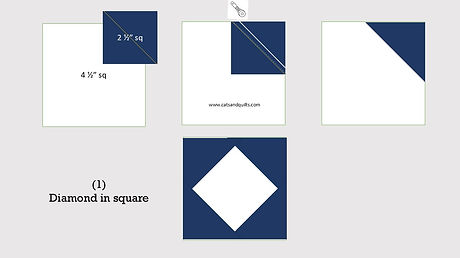
Dimond - in -a -Square Unit
-
Draw a diagonal line on the wrong side of each 2½" square.
-
Place one 2½" square on a corner of the 4½" square, right sides together.
-
Sew just outside the drawn line, toward the corner.
-
Flip the corner open and press. Check that the edges align with the larger square.
-
Trim away the excess fabric, leaving a ¼" seam allowance.
-
Repeat for the remaining 3 corners to complete the Diamond-in-a-Square Unit.
Half-Square Triangle (HST) Units
-
Place two 5" squares right sides together.
-
Draw a diagonal line from corner to corner on the wrong side of one square.
-
Sew ¼" away from the drawn line on both sides.
-
Cut along the drawn line.
-
Open and press.
-
Trim each HST to 4½" square.
-
Repeat to make 4 HST units total.

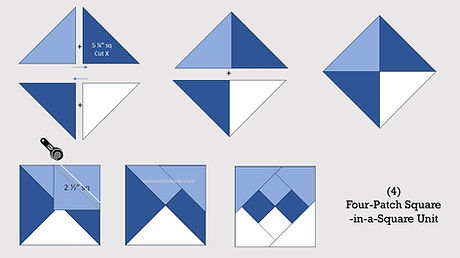
Four - Patch-In-A-Square unit
-
Cut a 5¼" square twice diagonally to make 4 triangles. For an oversized option, start with a 5⅜" square.
-
Sew the 4 triangles together, as shown in the diagram.
-
Press, then trim the unit to 4½" square.
-
Draw a diagonal line on the wrong side of each 2½" square.
-
Add a 2½" square to each corner using the same stitch-and-flip method as the Diamond-in-a-Square Unit.
-
Flip each corner open and press. Check the alignment before trimming away the excess fabric, leaving a ¼" seam allowance.
-
Repeat for all 4 corners.
Make 4 units.
BLOCK ASSEMBLY
-
Arrange the 9 units into 3 rows, following the block layout diagram. Rotate the units carefully so the design is oriented correctly.
-
Sew the 3 units in each row together. Press the seams in opposite directions on alternating rows to help the seams nest.
-
Sew the 3 rows together, matching and pinning the seam intersections and points carefully.
-
Press the block, then check that it is square and the edges are even.

Cutting Guide
Option 2
Dark blue
(2) 5” x 5”
(4) 2 ½” x 2 ½”
Medium blue
(8) 1⅞" x 1⅞"
Light blue
(4) 2⅞"x 2⅞" cut diagonally once to make 2 triangles, you’ll need 8 triangles
(4) 1⅞" x 1⅞"
Background
(1) 4 ½” x 4 ½”
(2) 5” x 5”
(4) 2⅞"x 2⅞" cut diagonally once to make 2 triangles, you’ll need 8 triangles

Option 2
-
Sew four 1⅞" squares together to make a Four-Patch unit. Press the seams in opposite directions so they nest neatly, then join the two rows.
-
Sew one triangle to each side of the Four-Patch unit to create a diamond-in-a-square unit. Center each triangle carefully before sewing.
-
Press the triangles away from the Four-Patch. Check that the Four-Patch points are ¼" from the outer edges of the unit so they won't be cut off when the units are joined.